SolusVMControl is an addon for WHMCS which is designed to allow VPS resellers who purchase their VPS from providers using the SolusVM platform to allow their users to boot, reboot and shutdown their VPS from within your WHMCS client area.
Please note that this release is currently untested.
All files should be chmod 644.
Once you have uploaded all of the files, go to the Addon Modules menu option under Setup on the WHMCS menu. You will see SolusVM Control on listed. Click Activate to the right hand side to activate it.
Once activated, you will see a new section on the Addon Modules page. Under the "SolusVM Control" section, enter your license key and select which user groups should have access. Once you have done this, click Save Changes at the bottom of the page.
SolusVM Control should now appear in the top menu under Addons and be fully functional.
To allow SolusVM Control to appear in the client area, you will need to make a small change to the clientareaproductdetails.tpl file, you should add the following code:
{if $SVMC.enabled}
<p><h4>Server Actions:</h4></p>
<table>
	{$SVMC.js}
	<tr>
		<td class="fieldarea">{$SVMC.serveractions}:</td>
		<td>{$SVMC.buttonstatus} {$SVMC.buttonboot} {$SVMC.buttonshutdown} {$SVMC.buttonreboot}</td>
	</tr>

	<tr>
		<td class="fieldarea">{$SVMC.serverstatus}:</td>
		<td id="serverstatus"></td>
	</tr>
</table>
{/if}
just below the line that looks like the following
{if $moduleclientarea}<div class="moduleoutput">{$moduleclientarea|replace:'modulebutton':'btn'}</div>{/if}Please note that if you have a completely custom template, you can simply make use of the smarty variables which are detailed below
{$SVMC.enabled} // Will have a value of true if SVMC is enabled for the given VPS.
{$SVMC.js} // Returns the generated JavaScript required for the jQuery AJAX requests
{$SVMC.serveractions} // The server actions label
{$SVMC.serverstatus} // The server status label
{$SVMC.buttonstatus} // The status button {$SVMC.buttonboot} // The boot button {$SVMC.buttonshutdown} // The shutdown button {$SVMC.buttonreboot} // The reboot button
You must also have an html entity with the id "serverstatus" (this is where the jQuery AJAX response will be displayed).
There are two probable solutions:
- Please make sure that the solusvm_server is in the format “http://ip-or-hostname:port” (has the protocol, host and port).
- Make sure the server SolusVMControl is installed on allows connections out on the port your SolusVM Server uses (usually 5353). If you are using csf, you can add the following to your csf.allow file (replace SOLUSVMIP with the IP of your SolusVM server) tcp:out:d=5353:d=SOLUSVMIP
The solusvm_server variable should usually be the same as the URL where you login to SolusVM. e.g. http://11.22.33.44:5353 or http://cp.solusvm-server-hostname.com:5353
- Navigate to SolusVMControl Admin (Login to your WHMCS admin, hover on the “Addons” tab at the top and click “SolusVM Control”).
- Click the Enable tab at the top
- Click the enable button next to the package that you would like to enable SolusVMControl for. Please note that only packages with the product type “VPS/Dedicated Server” will appear on this list.
- Once you have done this, all instance of that product will appear on the Summary tab.
- Navigate to SolusVMControl Admin (Login to your WHMCS admin, hover on the “Addons” tab at the top and click “SolusVM Control”).
- Make sure you have already enabled SolusVMControl for your SolusVM packages.
- Make sure that you are on the SolusVMControl Summary page
- Select the product you would like to enable SolusVMControl on by clicking the domain (in the middle column).
- Fairly near the bottom, you should see three new fields titled solusvm_server, solusvm_api_key, solusvm_api_hash.
- In the solusvm_server field, enter the domain of your SolusVM master (in the format noted in FAQ #2)
- The solusvm_api_key and solusvm_api_hash can be found by logging into SolusVM, selecting the applicable server and clicking “API Settings”, see image below:
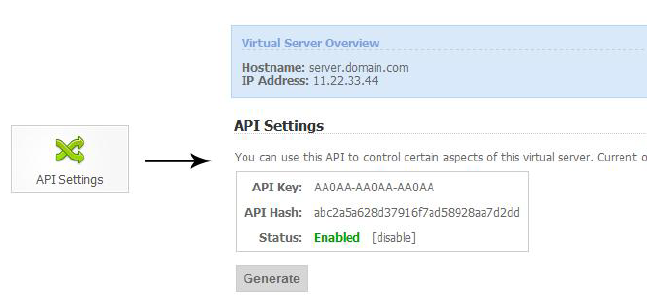
If the credentials are not visible, click generate (and make sure the status is set to Enabled).
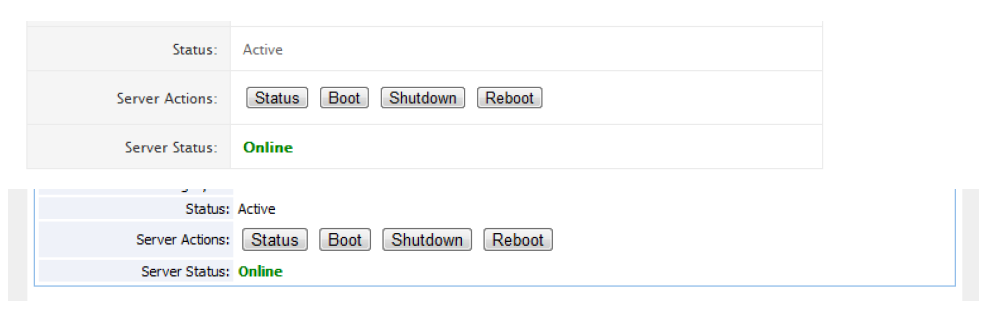
- Assuming that you entered valid details into the boxes, the buttons and information boxes should now appear on the products details page. Below are a few examples showing it working with the stock portal and default templates.