HomeOverlord is a simple web-based home automation interface for HomeEasy (HE853) and HomeMatic (CUL/Homegear)
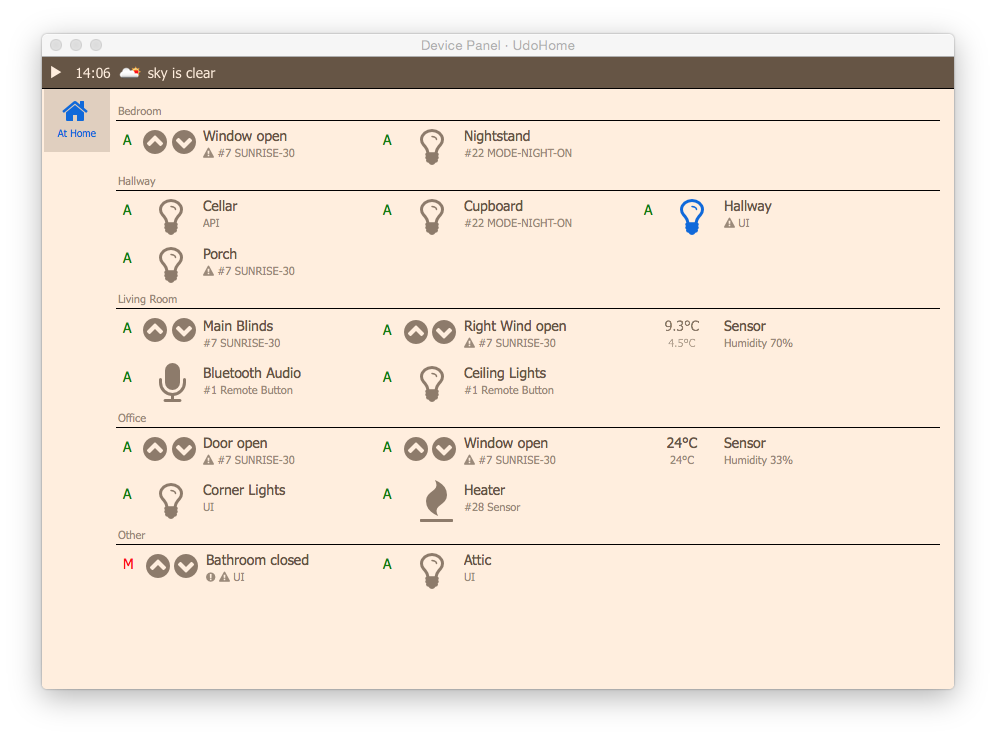
This is (for the time being) the main screen of HomeOverlord, the panel where you can control devices directly. The UI switches automatically between a day and night color scheme. Beyond that, HomeOverlord provides a neat system of event triggers to make your little device minions do whatever you want, behind the scenes.
At this stage, this is a project that runs for me, but it's not really designed to be portable to other homes. In theory, it might work. It might not. The software is designed to work with the HomeEasy HE853 USB stick to address HomeEasy devices, and the CUL using the Homegear XMLRPC interface to communicate with HomeMatic devices. To be a full home automation solution, features are still missing. For example, right now you have to do HomeMatic pairing with the (albeit browser-based) command line interface. I run the software on a Raspberry Pi, in theory it should work well on pretty much any architecture that supports those USB devices. For reference, I included my current home configuration verbatim. Also, there is no installer.
Installing this thing is painful. You're going to need the following:
-
Hardware: a spare Linux-ready device, preferrably a Raspberry Pi or something similar. For HomeEasy devices, there is a simple HomeEasy USB sender you can buy, plug it in. For HomeMatic devices, use a CUL or really anything that works with Homegear. I'm using both a HE USB controller and a CUL/Homegear since I have both systems deployed at home.
-
A LAMP-style web server supporting PHP and preferrably with websocket forwarding. I use nginx/php-fpm/MySQL. Clone the repository into your web server's htdocs directory. Create a database named hc or similar, import the SQL file from setup/ and ed7it the file config/defaults.php with your database credentials.
-
For HomeMatic support, install https://github.com/hfedcba/Homegear (or download the pre-compiled version). HomeGear is an excellent piece of software that enables HomeOverlord to use XMLRPC to communicate with Homematic devices. Alternatively to the CUL/Homegear combo, you could probably use the HomeMatic CCU1/2 via its XMLRPC interface. Since HomeOverlord sends HM XMLRPC to port 2001 and listens at 9091 on the localhost, you will have to do some port forwarding to the actual CCU. Alternatively, you could edit the source code of node/srv.js to the CCU address. Since I don't have a CCU, I have no idea if this works but it should.
-
Node.js and at least the following npm modules: http, sys, request, child_process, url, ws, xmlrpc, and possibly others. Start the node process manually ("node node/srv.js") to check for error messages. If that works out, you can start the process as a daemon with node/start.sh - this will also start the homegear daemon if present.
-
For HomeEasy support, plug in the HomeEasy USB stick. I have checked in a version of the driver that runs on the Raspberry Pi. If you're not on Pi, you're going to have to recompile the driver in bin/he853-remote/
-
Open phpMyAdmin or any other MySQL admin interface and create an account for yourself in the accounts table. Hash the password with sha1 (I know, just go with it).
-
Open the file config/defaults.php and edit the "geo" section to reflect your longitude, latitude, city name, and time zone name.
- HomeOverlord lets you organise your home automation by room.
- Control any kind of HomeEasy and HomeMatic switch.
- Control HomeMatic window blinds actuators.
- Hook up HomeMatic sensors to switches and other actuators (even HomeEasy)
- Use the Raspberry Pi's GPIO to control up/down window blinds actuators directly
- Create a home automation schedule based on events such as sensor input, time of day, sunset and sunrise, and weather.
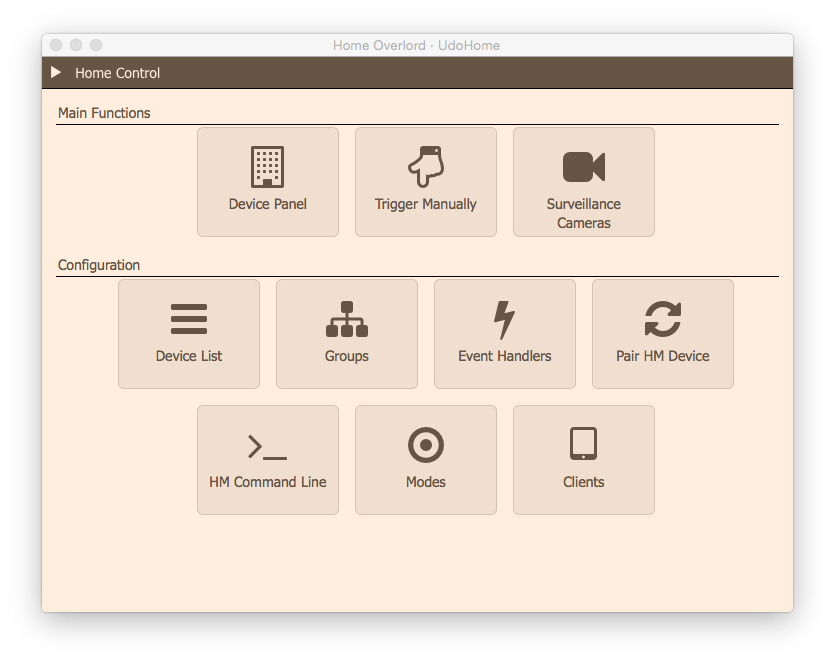
- Homematic pairing straight from the UI
- Creating and editing devices from the UI
- Automatic and manual device mode that allows you to pause automation
- Dimmers
- Flexible settings for blind actuators
- Sound output
- Granular admin functions
- Use phpMyAdmin to create a device in the devices table. Set at least the following variables: d_bus="HE", d_type to device type such as "Light", "d_name" to a descriptive name, d_id to the HomeEasy device id you want it to have, for example "1001", d_room to the room it's in.
- Activate pairing mode on the device
- Bring up the HomeOverlord devices list and switch on the device
- The device should now be paired
- Bring up the devices list to verify and, if needed, edit your device settings

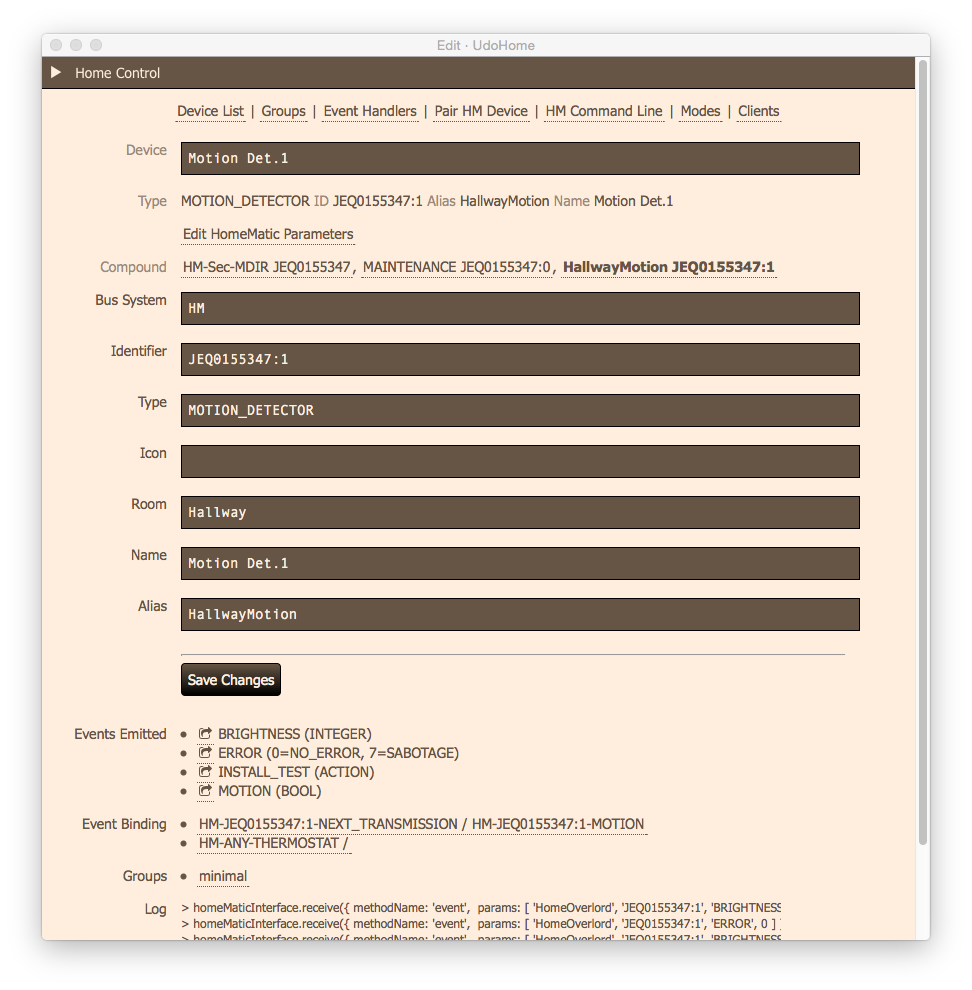
Once a device exists, you can edit its properties by selecting the device from the list. Top most is the device name - this is what HomeOverlord will use to display the device. For HomeEasy devices, the Bus System is "HE"; for HomeMatic it's "HM"; and for Raspberry Pi GPIO it's "GPIO". The Identifier is the internal ID of the device. Together with the Bus, this field forms the address of the device - do not change this unless you have a good reason to. The Type field refers to the type of the device, for example "Light" for a light on/off switch. The Room field assigns the device to a specific room in your house. The Alias field is an optional ID you can assign to the device yourself; these aliases can be used in place of Device IDs when scripting events.

- Go to the Pair HM Device screen, and click "Start Pairing Mode". Homegear should now give you 60 seconds to pair.
- During this time, Homematic messages will be displayed in the window. Once a device is successfully paired, appropriate messages should appear, depending on the device type.
- Activate pairing mode on the device. Some devices require the pairing to be confirmed, so you have to hit the switch on the device once more to complete the pairing.
- After pairing, click on "pairing finished" to save the new device settings
- Use the device list to make necessary adjustments to the device's settings
- By clicking on "HM" from the device list, you can also change a device's HomeMatic system settings (refer to the HomeMatic documentation for info about your device parameters).

Go to the home menu and click on Event Handlers.
The following event address codes are supported right now for "C" type events. These events are triggered from a specific device [id], on a bus [bus] ("HM" for HomeMatic), regarding a parameter [param], and a [value].
- "ALL": this address reacts to all device events
- "[bus]-ANY": activated by all events on that bus, for example "HM" for all HomeMatic events
- "[bus]-[id]": activated by all events from that device
- "[bus]-ANY-[param]": activated by all events regarding that parameter
- "[bus]-[device]-[param]": activated by all events from that device regarding that parameter
For example, an HomeMatic key device called "KEQ0180768:1" issues a "PRESSED" parameter when it's activated. To catch that, make an event handler with the address "HM-KEQ0180768:1-PRESSED".
The following list described system-driven address codes for "T" type events.
- "TICK": called every timer tick (usually once per minute)
- "TIME-[HH]:[MM]" where [HH] is the hour and [MM] is the minute of the current time
- "[DOW]-[HH]:[MM]" where [DOW] is either the day of the week "MONDAY", "TUESDAY", "WEDNESDAY", "THURSDAY", "FRIDAY", "SATURDAY", or "SUNDAY"
- "[WD]-[HH]:[MM]" where [WD] is either "WEEKDAY" or "WEEKEND"
- "SUNRISE" or "SUNSET" for the moment of sunrise, sunset
- "SUNRISE+[OFFSET]" or "SUNSET+[OFFSET]" or "SUNRISE-[OFFSET]" or "SUNSET-[OFFSET]" where [OFFSET] is the offset in minutes to either sunrise or sunset
- "[WEATHER]" where [WEATHER] is an openweathermap.org weather name, such as "CLOUDS"
You can use short device command codes to control your devices. Use one line per device. The general format is:
:[DeviceID/Alias]:[PARAM]:[VALUE]
Where DeviceID is a system device ID, Alias is a device alias, PARAM is the name of the parameter that should be changed, and VALUE is the value it should be changed to.
For example, if you want to activate a light called "HallwayLight":
:HallwayLight:STATE:1
If you also used a reverse event address, you can give a second value to take care of that event:
:[DeviceID]:[PARAM]:[value1]:[value2]
For example, you have two buttons BTN1 and BTN2, and want to use them to switch a light called "HallwayLight" on and off:
Action: BTN1-PRESSED
Reverse: BTN2-PRESSED
Code: ":HallwayLight:STATE:1:0"
Sometimes, you don't want to set a state at all. To avoid splitting up multiple shortcode lines, you can simply give an empty value in these cases:
:MyDevice:STATE::1
In this example, only the reverse address sets the state of the device.

In addition to shortcodes, event handlers can also carry out commands that allow for more complex operations. Commands can be chained together in the same line with the slash ("/") character.
Executes the commands that are chained behind it if it's day time. For example:
DAY?/MODE:Day Mode
Executes the commands that are chained behind it if it's night time. For example:
NIGHT?/MODE:Night Mode
Executes the commands that are chained behind it if the action was invoked (as opposed to its reverse action). For example:
ACTION?/:WindowBlinds:LEVEL:1
Executes the commands that are chained behind it if the reverse action was invoked (as opposed to its normal action). For example:
REV?/:WindowBlinds:LEVEL:0
Executes the commands that are chained behind it if the given mode X is active. For example:
MODE?:Night/:WindowBlinds:LEVEL:0
Triggers another event X. For example:
CALL:Shutdown
Selects a number of devices and calls the command that is chained behind it. For example, the following command selects all devices that are lights and then calls the SET command on them:
SELECT:TYPE=Light/SET:STATE:0
There are different properties you can select devices by:
SELECT:ALL			: select all devices
SELECT:NONE			: select none
SELECT:OTHER		: all devices that have not been used so far
SELECT:TYPE=X		: all devices of type X
SELECT:TYPE=BUS-X	: all devices of bus BUS and type X
SELECT:TYPE!=X		: all devices not of type X
SELECT:SUBTYPE=X	: all devices of sub-type X
SELECT:SUBTYPE!=X	: all devices not of sub-type X
SELECT:PRI=X		: all devices of priority X
SELECT:PRI>X		: all devices of priority greater than X
SELECT:PRI<X		: all devices of priority less than X
SELECT:GROUP=X		: all devices in group X
SELECT:GROUP!=X		: all devices not in group X
SELECT:MAP=V			: use variable V to do a map lookup
SELECT:X				: select device with name/id X
You can chain several of these property selectors together with the colon (":") separator, just as you can chain commands together with the slash ("/") separator.
The REMOVE command works exactly the same as the SELECT command, except that it removes devices from the list instead of adding them.
Sets the automation property to X (or Y for the reverse action) of the selected devices. Valid values for automation are either "M" for manual, or "A" for automatic. For example, the following command switches all lights to manual, and then to automatic for the reverse action:
SELECT:TYPE=Light/AUTO:M:A
Sets the property P of the selected devices to value X (or Y for the reverse action). For example, the following command turns on all lights, and switches them off for the reverse action:
SELECT:TYPE=Light/SET:STATE:1:0
Activates the mode X. For example, the following command switches the house to Night mode:
MODE:Night
Maps value X to value Y. This can later be used with the SELECT:MAP statement, or using $this->map[] in a PHP/ line.
MAP:OfficeThermo > OfficeHeater
Put the current state of the script into the log file log/event.debug.log. The following example selects all lights and puts the result into the log file:
SELECT:TYPE=Light
LOG
Puts information about the current line into log/event.debug.log. The following example selects all lights and puts the result into the log file:
SELECT:TYPE=Light/LOGLINE
Executes the rest of the line as PHP code:
PHP/$this->map['bar'] = 'foo'
This command can be used to drive a simple on/off heating device with a thermostat.
T must be a thermostat device that provides both the SET_TEMPERATURE and TEMPERATURE parameters. If T is omitted, the event emitter is used as the thermostat instead.
THERMOSWITCH then compares both parameter values and determines if commands down the line should use the normal action or the reverse action. If THERMOSWITCH comes to the conclusion that heating should be applied, the normal action is selected - if the heather should be turned off, the reverse action is selected.
The following example selects all devices of subtype "heater", uses thermostat "thermo1", and turns them on or off accordingly:
SELECT:SUBTYPE=heater/THERMOSWITCH:thermo1/SET:STATE:1:0
The following example maps thermostats to heaters and switches them if the current mode is "At Home" (using this method you can use a single event handler to switch all the heaters in different rooms individually):
MAP:OfficeThermo > OfficeHeater
MAP:LivingRoomThermo > LivingRoomHeater

MODE?:At Home/SELECT:MAP=emitter_alias/THERMOSWITCH/SET:STATE:1:0
You can also use plain PHP code in your event handlers for maximum customizability. Pure PHP event scripts start with the line "#PHP".
From within your PHP code, you can call both Event Shortcodes or Commands by using the $command() function.
For example, the following code activates logging to log/event.debug.log, turns on the living room lights if the emitter value was above 10:
#PHP
$log = true;
if(emitter_value > 10) $command(':LivingRoomLights:STATE:1');
The following pre-defined variables exist for your PHP scripts:
$emitter_id: ID of the device that caused the event
$emitter_param: name of the event parameter triggered
$emitter_value: value of the parameter
$emitter_alias: alias of the emitter device (if any)
$emitter_root: name of the root device (if any)
$emitter_name: human-friendly name of the emitter (if any)
$reverseAction: if the reverse action has been triggered
Theoretically, you can call any HomeOverlord function from your PHP scripts, but then you run the chance of breaking things. Stable API functions you can call from custom event handlers include:
broadcast($msg): broadcasts the array as a message to all clients
getExtendedDeviceState($deviceID): gets a list of all the device's paramters
getDeviceDS($deviceID): gets the device data set by its ID (or alias, or key)

HomeOverlord allows you to assign specific settings on a per-IP-address basis, so you can for example control what a specific panel device will display.
Bring up the clients list to see a list of clients that have recently accessed the HomeOverlord user interface. Click on a specific client to change its settings. As of now, on that screen you can choose a common name for the client and select which rooms of your house apply to the client.
On the clients list screen you can also trigger a screen reload of all connected devices.

Modes are a way to change the behavior of devices according to a specific circumstance. For example, the Away mode could be used to make sure all non-essential devices are turned off.
To add or change the available modes, go the the admin screen and then select the "modes" option. On the modes page, you will see a list of modes, separated by line breaks.
When a mode gets activated, HomeOverlord will look for an event handler with the following naming scheme, where [name] is the name of the mode:
MODE-[name]-ON
the same applies when a mode is turned off:
MODE-[name]-OFF